Policy Versioning
There are cases, like policy renewal when you need to create a new version of a specific policy. To accommodate the versioning functionality, from an insurance business perspective, the Core Policy Admin solution uses a combination of the FintechOS standard versioning process mechanism and custom development. Consequently, you use the FTOS_VersioningHelper client side library and follow the standard procedure when configuring version settings, version settings items and entity settings. However, for policy versioning, you use the FTOS_VersioningHelper_Edit client side library in order to keep some attributes Read Only, even when the policy is in Version Draft business status, with isEditable option enabled.
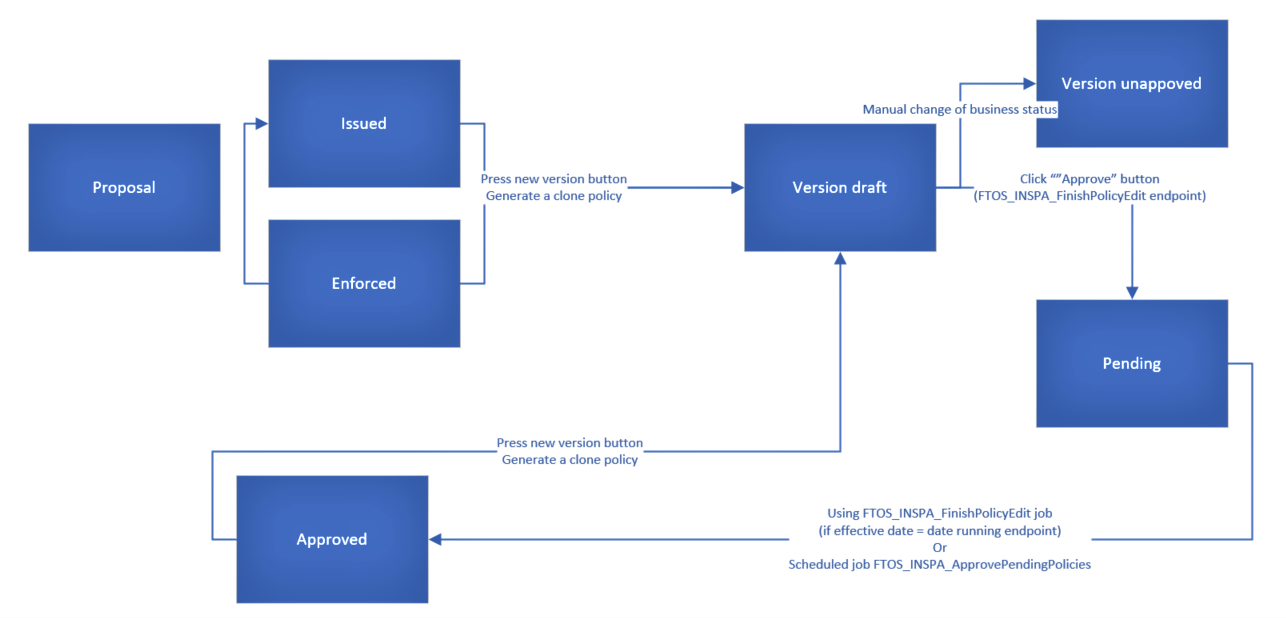
The versioning functionality is available only for issued, enforced or approved policies, for users that have the rights to use the functionality.
After clicking the New Version button on the initial policy (P1), a policy clone (P2) is registered, in Version Draft status.
The status of the new policy P2 can be changed to Version Unapproved, following the standard process (manually change the status of the record).

The standard approval process (changing the status from Version Draft to Approved) was replaced by an automated process, especially implemented for the policy.
The user needs to fill in the effective date for the change and press Approve button. The version will remain in Version Draft status until the effective date is reached and it will be automatically transitioned to Approved status, on that day.
If the effective date is also the date when the user validated the changes by pressing “Approve button“, than the request will transition automatically from Version Draft to Pending and also from Pending to Approved.
If the Policy Begin Date is greater than the current date, then the policy status will be transitioned to the Issued status.
If the Policy End Date is lesser than the current date, then the policy status will be transitioned to the Maturity status.
If the conditions above are not respected, then the policy will be transitioned to the previous status of the policy.
The following processes will generate automatically newly approved versions of the policies:
-
Cancellation (Ex-Surrender) - for the updates of end date and premium;
-
Lapsing - or the updates of end date and premium.
-
Cancellation without an update of the premium (eg. Cancellation with Claims), the schedule has to be updated with a schedule including just the paid installments in the paid status and the future unpaid installments in Canceled status (new status for PaymentScheduleDetail);
-
Lapsing - same as above;
-
Cancellation with premium returned the schedule has to be updated with a schedule including the paid installments, the future unpaid installments in Canceled status plus an additional installment which is equal with :minus: the value of the returned amount. The due date will be equal to the approval date of the cancellation and the status of this payment schedule detail will be On Time (TBD).
After the automatic version approval process, the status for policy must be changed according to the process which triggered the versionning:
-
If the version approval has been made after the Lapsing process - the policy status is transitioned from Approved to Lapsed.
-
If the version approval has been made after the Cancellation process - the policy status will be transitioned from Approved to the specific status for Cancellation: Closed by claim, Decline by screening etc.
Business workflow configuration actions
Pending - Approved - When you click Approve, the script checks the effective approval date. If it is less than or equal to the current date, it will move the policy version record into the Approved status. If not, the record remains in Pending status until the FTOS_INSPA_ApprovePendingPolicies job moves it to Approved, according to the effective chosen date.
Version Draft - Pending - If the necessary validations are met, clicking Approve changes the status of the cloned policy from Version Draft to Pending.
A new version of the policy can be made from the Issued and InForce statuses.
The Approved status is not visible in the interface, and the transition is automatically made to the business status of the policy.
For advanced versioning configurations, endpoints, and server side scripts, check the Advanced Versioning Configurations page.
-
Access an existing Master Policy and click the Insert (+) button, called New Version, available on the top right corner.
-
An edit form of that Master Policy opens, with a new version in the Version Draft status, so you will be able to change and update the information related to that Master Policy.
-
When the Edit form opens, the Master Policy Summary tab is automatically selected.
-
Both tabs, Master Policy Summary and Policies List, are displayed.
-
-
The status of the newly added version of the Master Policy is Version Daft and the next status is also displayed, Version Unapproved.
Once the edit form opens, the user is able to change the following:
-
The values from any field of the Master Policy section, except the Master Policy No and the Currency fields. The Master Policy No remains the same like the one before versioning;
-
the text from the Mentions section;
-
the values from the Premium Payment Schedule section.
-
The user is able to only update the installments in the On Time status;
-
Once the values here change and a new version of the Master Policy is added, a new version is added for the Premium Payment Schedule section.
-
After the desired changes are made in the Version Draft status, the user is able to:
-
Unapprove this version, by manually switching the status of the version from the top left corner;
-
Approve the new version by filling in the Effective Date of the version and clicking the Approve button.
-
The effective date is available at the end of the Master Policy form in the Master Policy Summary section, and it is mandatory if the user wants to approve a version;
-
The Effective Date cannot be sooner than the beginning date of the Master Policy;
-
If the user will press ‘'Save and close’' or ‘'Save and reload’' (top right corner buttons) before pressing
-