Installing Core Policy Admin 3.2.0
Follow the guidelines below to import and configure the Core Policy Admin module.
1 Prerequisites
Platform version compatibility: HPFI 21.2.2.2 and above.
Dependencies: SySDigitalSolutionPackages v21.2.2000.zip or higher.
Insurance Apps Dependencies: Core Insurance Master V2.2.0.

If you already have a Policy Admin Import asset installed on your environment, you need to apply the appropriate upgrade asset so start by checking if there is any upgrade listed for your solution before applying this package.
2 Import Packages
Package description:
-
Core Policy Admin v2.0 - Data package for managing policies.
-
Policy Admin Import v2.0 - Data import configuration package for roles and insurance parameters.
3 Installation
The following is the standard procedure for how to import a digital asset:
Go to Innovation Studio and log in with Developer credentials.
Navigate to the DevOps menu entry. From the dropdown, click on Deployment Package to open the Deployment Package List page. On the top right-hand side corner, click the Import deployment package icon.

The local File Explorer window opens. Select from the local drive the file to be imported. Pay attention to the order of importing the chosen package, as stated in the Import Packages section and the Prerequisites section.

After selection, a new form is launched showing the contents of the package and asking if you want to import those. Check the list and click Continue Import if you are satisfied.

A pop-up asking you to confirm that you want to import appears. Click Yes to continue. After this confirmation, another window opens where you indicate the Project name. Either give a new name for your import or select the name of a previous import project, from the helper dropdown. You might want to select the same name for the project that you use to import all the packages of the Insurance suite, as enumerated in the Prerequisites section. Confirm the Project Name selection and click Import to start the job.

After the import is finished, you can see the success message and the Deployment Package Log window which allows you to see into the details of the import project.
4 After installment configurations
4.1 Enable System Parameter
Proceed to enable the PolicyAdminUsed system parameter as described below:
Go to Studio and log in with Developer or Release Manager credentials.
Navigate to the DevOps menu entry. From the dropdown, click on Deployment Package to open the Deployment Package List page. From the list, select the Core Insurance Master Digital Asset and double click to open the Digital Asset Form. Inside the form, go to the General tab and click Set as context digital asset. This way, you allow the Core Insurance Master to manage the policy flows stored by the Core Policy Admin module.

After this step, go back to the main menu and navigate to the Admin menu entry. From the dropdown, click on System Parameters to open the System Parameters List.

Depending on the number of views set on the list, it is possible that you don't see the PolicyAdminUsed parameter. Inside the list, use the Search by Name option to search the PolicyAdminUsed parameter and and double click to open it for edit. Inside the Edit System Parameter form, set the value to 1, then click Save and close, at the top right corner of your screen.

4.2 Approve Insurance Parameters
Go to Portal and log in with Developer or Release Manager credentials.
On the left side of the screen, open the main menu. From the dropdown, choose Settings and click to open it. Got to Insurance Parameters and click to open.
From the Insurance Parameters List , select a parameter and double click to open it for editing.
After the Parameter window opens, from top left corner of your screen, change parameter status from Draft to Approved.

Repeat this procedure for all the Insurance Parameters in Draft status.
4.2 Notifications
In order to send the notifications, the SMTP credentials are needed to be added in the job server and portal’s webconfig file. Please check if there are SMTP keys inserted (please find bellow some credentials only for example).
<add key="SMTP:Port" value="***" />
<add key="SMTP:Host" value="***" />
<add key="SMTP:EnableSSL" value="0" />
<add key="SMTP:User" value="***" />
<add key="SMTP:Password" value="***" />
<add key="DefaultFromEmail" value="***" />
*** = your SMTP information
1 Prerequisites
Internal version: v3.2.0.20
Platform version compatibility: HPFI 21.2.2.2
Dependencies: SySDigitalSolutionPackages v21.2.2000.zip or higher
Insurance Apps Dependencies: Core Policy AdminV3.2.0
Upgrade instructions: install Core Policy Admin Import Upgrade V3.2.0 instead
Install instructions: Follow the standard instruction on how to import a digital asset here.
2 After installment configurations
If you already have a Core Policy AdminImport asset installed on your environment you will need to apply the appropriate upgrade asset so start by check the Upgrade from section before applying this package.
1 Prerequisites
Platform version compatibility: HPFI 21.2.2.2.
Dependencies: SySDigitalSolutionPackages v21.2.2000.zip or higher
Insurance Apps Dependencies: Core Policy Admin 3.2.0
Upgrade from: Core Policy Admin Import 1.14.9
Upgrade instructions: before importing the digital asset, run the SQL scripts available in the Upgrade folder from the digital asset location.
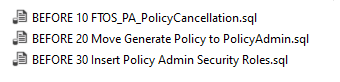
Install instructions: Follow the standard instruction on how to import a digital asset here. After installing the digital solution, run the SQL script from Policy Admin Import Upgrade folder.
2 After installment configurations
If you already have a Core Policy AdminImport asset installed on your environment you will need to apply the appropriate upgrade asset so start by check the Upgrade from section before applying this package.