Insured Object Types
An Object groups together individual properties (dimensions) that transcend an insurance product. For example, for a Motor object, you might want to define Brand, Model, and Year dimensions, amongst others. On the other hand, for a Person (as a particular Life insurance object type), you might want to define Age, Weight, Medical Conditions, and Employment dimensions.
The functionality allows you to create diverse object types, from types representing very concrete insurable objects - such as house objects, or car objects, to health and life objects, and even more abstract objects - such as cyber insurance objects. Additionally, your objects are independent from products, so that you can easily operate with and maintain them. (See also the Insured Object Types Operations section, at the bottom of the page.)
Once defined, and Approved, you can embed the same object into different insurance products, and offer it to different audiences. For example, an apartment object can be included in two or more property insurance products, each of the products having different types of coverages, premium calculation formulas, and underwriting rules.
Preventing deletion of Approved objects is one important aspect of this feature and provides benefits, as follows:
-
ensures that product integrity is maintained while the product is live.
-
products must remain "as purchased" to comply with regulations - meaning you can't change a product once purchased by a customer, unless you advise them of the change, in advance, in writing.
-
data is available for accurate reporting - underwriters need to compare like with like for their pricing models.
The Insurance Product Factory solution handles different types of changes affecting an insured object type during its lifetime. This is accomplished by transitioning the object through different business states (from Draft to Closed) and also by versioning it. The solution also logs these life cycle details in the object history tab, for further analytical use.
Below, an example of the Insured Object Type business workflow, including the versioning:
The available Insured Object Type business statuses are:
-
Draft
-
Approved
-
Unapproved
-
Closed
-
Version Draft
-
Version Unapproved
-
Version Closed
An insurance product can only be Approved if it has an attached object type!
Insured Object Types View
In Innovation Studio, in the Insured Object Types section, you have an overview of all the object records registered in your system - your collection of Insured Object Types. This is an all-inclusive view; yet, you can also use the Search by option (in the list header) in order to find a certain record.
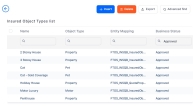
Below, you can see an example of an Insured Object Types List, with objects filtered by their business status:
Follow these steps to view your Insured Object Types:
-
In Innovation Studio, at the top left corner of your screen, click the main menu icon to expand the main dropdown list.
-
From this main list, click Insurance Product Factory. A second panel opens, to the left.
-
Next, click Insured Object Types to go to the Insured Object Types List.
On the Insured Object Types List page:
-
To inspect a record from the grid, double-click it.
-
To add a new record, click Insert, at the top right corner of the page.
-
To edit a Draft record from the grid, double-click it and make your updates. Next, click Save and close.
-
To delete a record from the grid, select it and click Delete, at the top right corner of the page.
You can export one or more records by pressing Export, at the top right corner of your screen.
Insured Object Type Insert Form
The following fields are available for configuring an Insured Object Type:
This is the header section and it contains the following fields:
| Field | Description |
|---|---|
| Name | Insert the name of the object. |
| Object Type | Use the dropdown to select a type for the object. The available options are: motor, property, travel, personal accidents, and insuredObjectPet. (You can add more items to the option set, as needed.) |
| Insured Object Type Version | The version number is logged here, automatically. |
| Description | Describe your object. |
| Entity Mapping |
Use the dropdown to indicate an entity. This mapping makes all attributes of that entity available for you, for creating object dimensions. |
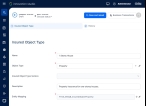
Below, an example of the form's header section, with some details filled in, for a property object:
This is the bottom section - where you can see all the Dimensions associated with your object. Inside this grid, the available operations are Insert, Delete, Export, and Refresh. After adding the dimensions, you can order them by using the order index column. You can drag and drop rows to reorder them - this also sets the order index for how dimensions are displayed further, on the policy form.
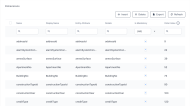
Below, an example of the form's bottom section, with some dimensions added, for a property object:
By clicking Insert on the grid, you can add attributes, as dimensions, only from the entity you have previously mapped to your object.
Follow the below steps, to add an object dimension:
-
In the Dimensions grid, click Insert. The dimension insert form opens.
-
Use the form to fill in the available fields:
Field
Description
Name
Indicate a name for the dimension. For example: brand, model, constructionYear, buildingType etc. This is a mandatory field.
Display name
Indicate a display name for the dimension. For example: Brand, Model, Construction year, Building type etc. This is a mandatory field.
Entity attribute
Use the arrow/ picker to select the attribute correlated with the dimension. You can only select attributes from the entity that you mapped when previously configuring the object. This is a mandatory field.
Details
Area for details regarding the added dimension. Not a mandatory field
Is Mandatory
Set to true if the current dimension is mandatory.
-
Click Save and close or Save and new, if you want to add another dimension to your object.
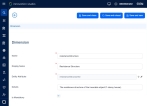
Below, an example of the dimension insert form, with some details filled in, for a property object:
You do not need to add the addressId dimension since this is added by default, for every object.
Insured Object Types Operations
The Insured Object Types functionality allows for the following operations:
In order to create an Insured Object Type, follow the steps below:
-
On the Insured Object Types List page, click Insert, at the top right corner of the page. The Insured Object Type form opens.
-
Use the form to create your Object. (See also the details above.)
-
Fill in the fields.
-
Select the entity mapping.
-
Select entity attributes to indicate object dimensions.
-
Click Save and close.
-
Repeat the steps above for each object that you need to configure.
When your object is in Active status (namely, it is attached to a Product), changing it may be done only by adding a new version. If this is your case, follow the details from the next section, about versioning.
Follow the below steps for modifying an object that is in Draft status:
- Open the Insured Object Types List page.
- From the list, choose the desired Insured Object Type record and double-click to open the record.
- Use the form to make adjustments to your object.
- Click Save and close, at the top right corner of your screen.
Follow the below steps for versioning an Insured Object Type in Approved status (namely attached to a Product):
- Open the Insured Object Types List page.
- From the list, choose the desired Insured Object Type record and double-click to open the record.
- Once opened, go to the top right corner of the screen, and press the Plus button to launch the versioning process. The object becomes editable.
- Use the form to make your adjustments.
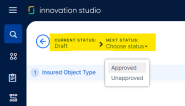
- Once finished, use the status picker at the top left corner of the screen to change the status of the newly created version from Version Draft to Approved.
Below, an example of the status picker: - After versioning, the object view opens and you can see your adjustments. You can also check the versioning log in the object's History tab.
- Click Save and close, at the top right corner of your screen.
You can only delete Object Types in Draft or Unapproved status.
To do so, please follow the next steps:
- Open the Insured Object Types List page.
-
From the list, select the Insured Object Type record and click Delete, at the top right corner of the page.
You cannot delete object types in status Closed and Approved Object Types, assigned to approved products.

