Product Life Cycle
The Insurance Product Factory solution handles different types of changes affecting an insurance product during its lifetime. This is accomplished by transitioning the product through different business states (from Draft to Closed) and also by versioning it. The solution also logs these product life cycle details - in the product history tab, for further analytical use.
Product versioning is performed by using the FintechOS FTOS_INS_VersioningWorkflow. This is a master business workflow, used to add the versioning functionality on any desired entity - including the entities used by the Northstar. For more details, scroll down to the Versioning an Insurance Product section.
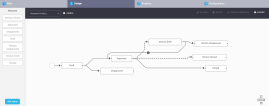
Below is an example of the FTOS_INS_VersioningWorkflow business workflow used by the Insurance Product Factory solution, as it is displayed on Innovation Studio:
The following are the behaviors - characteristic to any product, managed by this solution:
- Every product (or product version) starts in Draft status and must go through an approval process before going live.
- Once a product is live, its settings can no longer be modified.
- If you want to update a live product, you must create a new product version.
- When you create a new product version, the current version is retired.
- Only one version of a product can be live at one time.
- Only one draft version can be active at one time. If the case, you must close the current draft version and then, open another one.
States Descriptions
| Status name | Description |
|---|---|
| Draft | Initial state for any insurance product registered in the system. The draft products can be edited. |
| Unapproved | When a draft product is canceled. |
| Approved | Ongoing state - for live products. Products can't be edited. |
| Closed | Final state. The product is retired. The product cannot be moved from this state to any other states. |
| Version Draft | When the selected product becomes editable. |
| Version Unapproved | When the updates on the product are not approved. |
| Version Closed | When the product's draft version is closed. |
Product State Transitions
| Transition | Description |
|---|---|
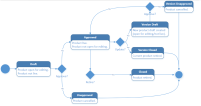
| _Draft | Initial state - for any insurance product issued into the system. |
| Draft_Approved | When a product goes from draft to live status. Live products can't be edited. |
| Draft_Unapproved | When the proposed product is canceled. |
| Approved_Closed | When a live product is no longer active. |
| Approved_Version Draft | When a new version is opened for a live product. The version is editable. |
| Approved_Version Closed | When the opened version is closed. |
| Version Draft_Approved | When the opened version is approved and becomes the new version for the selected product. |
| Version Draft_Version Unapproved | When the opened version is not approved. The product goes live without being modified. |
The product status transitions are illustrated below:
To access the Insurance Product Factory versioning business workflow in Innovation Studio, take the following steps:
-
In Innovation Studio, navigate down the main menu to Automation Blocks.
-
Click Automation Blocks and next, click Business Workflows, to open the Business Workflows Menu, on the left.
-
Click Business Workflows Designer to open the Business Workflows List page.
-
From the list, select and double-click the FTOS_INS_VersioningWorkflow record to inspect the business workflow attached to the Insurance Product entity.
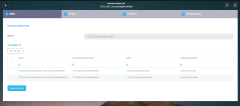
When the form opens, you can see the main information about the workflow, its statuses and transitions.
Below is an example of the business workflow details, as they are displayed in Innovation Studio:
Product Operations
Besides creating products or product sub-components from scratch (like products, risks, or types), the following operations are also available for managing your product portfolio, in Innovation Studio:
There are times when you need to create a draft product, rapidly. While the product is in Draft business status, the form is still editable and you can complete the product creation journey at a later time.
To create a draft product, please follow the next steps:
- Open Innovation Studio.
- At the top left corner, click the main menu icon to open the dropdown list.
- From the list, click Insurance Product Factory. A second dropdown opens.
- Click Insurance Products to open the Insurance Products List page.
- To add a new record, click Insert, at the top right corner of the page.
- The Insurance Product form opens. Start filling in the mandatory fields, in order to be able to save the record as a Draft.
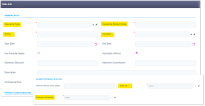
Mandatory fields:
| Field | Description |
|---|---|
| Insurance Type | From the dropdown, select an Insurance Type for your insurance product - for example, Auto, Health, Home, or Travel. See Insurance Types for details. |
| Insurance Product Code | Fill in the code of your insurance product. |
| Name | Insert the name of your insurance product. |
| Currency | From the dropdown, select the currency for your insurance product. |
| Prorata Type Configuration | Set the proportion rate type for premium payments. More details about Prorata Type Configuration in the description of the Policy Admin configurations section. |
| Write off | Set the tolerance threshold for writing off payments. More details about Write off in the description of the Payments Schedule & Billing configurations section. |
| Statement Generation | Configure the values to be used for automatic invoice generation. More details about Statement Generation in the description of the Payments Schedule & Billing configurations section. |
Below is an example of an Insurance Product form, with the mandatory fields highlighted:
Cloning a product is also a way to create a draft product from scratch, since every cloned product is registered in the system only in Draft status.
To create a clone product, please see the next section.
Every cloned product is registered in the system in Draft status, irrespective of the status of the original product. While the product is in Draft business status, the form is still editable and you can complete the product creation journey at a later time. For more details, see also the Cloning Insurance Products page.
Here are the details for cloning an insurance product:
- Open Innovation Studio.
- At the top left corner, click the main menu icon to open the dropdown list.
- From the list, click Insurance Product Factory. A second dropdown opens.
- Click Insurance Products to open the Insurance Products List page.
- From the list, select the insurance product that you want to clone and double-click it. Once opened, go to the top right corner of the screen, and press the Clone button to launch the cloning.
Below is an example of how the button looks like, in Innovation Studio:
- Next, the cloning pop-up opens. Use it to fill in a Name and an Insurance Product Code for the new product. After cloning, the product view opens and you can edit your new product.
When your Product is in Active status, changing it may be done only by adding a new version. For this case, you must follow the details from the next section, below.
Here are the details for modifying an insurance product that is in Draft status:
- Open Innovation Studio.
- At the top left corner, click the main menu icon to open the dropdown list.
- From the list, click Insurance Product Factory. A second dropdown opens.
- Click Insurance Products to open the Insurance Products List page.
- From the list, select the insurance product that you want to edit and double-click it. Once opened, use the form to edit your product.
Here are the details for versioning an insurance product:
- Open Innovation Studio.
- At the top left corner, click the main menu icon to open the dropdown list.
- From the list, click Insurance Product Factory. A second dropdown opens.
- Click Insurance Products to open the Insurance Products List page.
- From the list, select the Insurance Product that you want to version and double-click it. Once opened, go to the top right corner of the screen, and press the Plus button to add a new version of the product.
- Use the form to edit your Product.
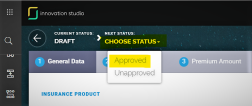
- Once finished, change the status of the version from Version Draft to Approved, at the top left corner of the screen.
Below is an example of changing the product status, by using the status picker. - After versioning, the product view opens and you can see your adjustments. You can also check the versioning log in the product's History tab.
For deploying changes on existing products, you can also choose to import the changes in a Data Config Definition file, as this functionality has the versioning mechanism embedded. For more details, see also the Importing Insurance Products page.
Pay attention to the fact that some policies might include the product that you want to delete.
To delete an Insurance Product record from the grid, please follow the next steps:
- Open Innovation Studio.
- At the top left corner, click the main menu icon to open the dropdown list.
- From the list, click Insurance Product Factory. A second dropdown opens.
- Click Insurance Products to open the Insurance Products List page.
- From the list, select the record that you want to delete and then click Delete, at the top right corner of the page.
This functionality lets you add product data on a destination environment by using the FintechOSData Import Templates. The most important use case for this functionality is a fast bulk import into the system of numerous new insurance products - with all imported products being registered in Draft status. But this is not the only use case. For more details, consult the Importing Insurance Products page.
Here are the details for importing Product Data by using the available Data Import Templates configured for the Insurance Product Factory solution:
- Open Innovation Studio.
- At the top left corner, click the main menu icon to open the dropdown list.
- From the list, click Evolutive Data Core. A second dropdown opens.
- Click Data Import Templates to open the Data Import Templates List page.
- From the list, select the Data Import Template that you want to update and double-click it. Once opened, scroll down to the List Of Data Imports section, and press Insert to upload your file. After import, you can see the new import added in the list and you also check the versioning log in the product's History tab.
Templates are different depending on what kind of data needs to be added. Check the Importing Insurance Products page, for more details about the templates for every import category.
The Insurance Product Factory maintains the underlying data in a consistent data model. Consequently, you have a reliable data model for your insurance products that you can reference when you build your digital journeys. This allows you to manage your product portfolio at will, without having to re-code your digital journeys every time an insurance product is added, updated, or retired.
